Table of Contents
Support for the language sever protocol has been native to Neovim since v0.5.0. However, until recently, configuration wasn’t always intuitive using native methods, and the use of plugins such as nvim-lspconfig were basically a requirement to simplify setup and manage per-server configuration. Here, we’ll look at the leaps Neovim’s LSP implementation has made, and how simple the native configuration has become.
If you’re just her for the LSP setup you can skip the history lesson and jump straight here.
What is LSP?
The language serve protocol (LSP) is a standardised JSON-RPC protocol originally developed by Microsoft for VS Code. The motivation behind this was to allow editors to be able to communicate with language servers which could provide capabilities such as autocompletion, go-to-definition jumping, diagnostics etc. (i.e the sort of features which are now considered the norm in modern IDE’s). Prior to this, every editor would have their own method of providing language aware features.
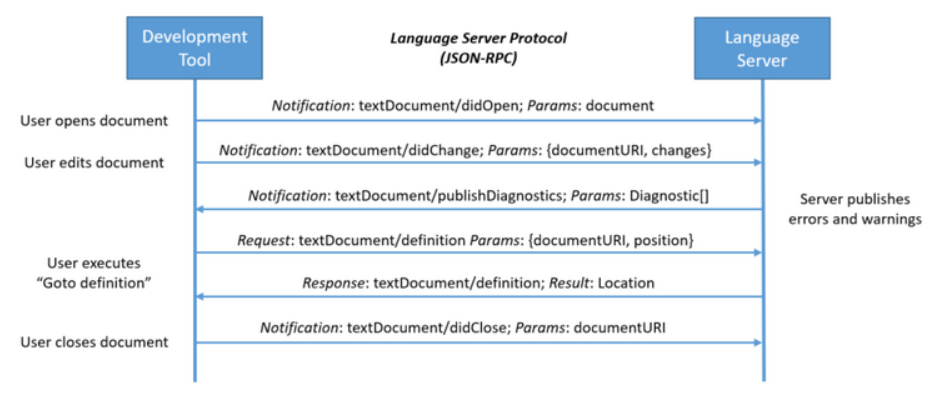
Essentially an editor (which the LSP specification refers to as tools) acts as a client communicating with a language server over a JSON-RPC message protocol. So when a document is opened and a request is made by doing something like go-to-definition, a message gets sent to the language server as structured JSON containing information, such as the current file and cursor position. The language server is able to analyse code in the context of a whole project, and sends back a response with something like the file and location of the definition.
Having this process as a standardised protocol means language servers can be used across different tools without these tools having to reimplement their own version of the same features. The Microsoft LSP overview and Specification are great sources for understanding how the LSP works in more detail.
LSP support in Neovim
From v0.5 to now (v0.12)
LSP support was first introduced to Neovim core with v0.5.0. Before this, Neovim had no built-in understanding of LSP. And so getting any sort of LSP like behaviour would rely on plugins such as YouCompleteMe, coc.nvim and ALE, among others, which would run external processes to connect Vim/Neovim to language servers. YouCompleteMe was my first experience with LSP features in Vim, and while the experience was pretty good it did feel like glueing together an IDE to run within the editor, as opposed to having those features feeling like they were part of the editor.
The addition of the LSP support into Neovim’s core introduced the vim.lsp Lua
framework which allowed Neovim to be able to communicate directly with language
servers. Semantic features like go-to-definition, hover documentation,
diagnostics etc. could now be achieved without the use of complex plugins.
However, though the initial integration was powerful, the configuration was
still not particularly intuitive, and so, plugins like nvim-lspconfig were
needed to make setting up language servers easier. From :h lsp-quickstart in
v0.5:
- Install the nvim-lspconfig plugin. It provides common configuration for various servers so you can get started quickly. https://github.com/neovim/nvim-lspconfig
- Install a language server. A list of language servers can be found here: https://microsoft.github.io/language-server-protocol/implementors/servers/ See individual server documentation for installation instructions.
- Add
lua require('lspconfig').xx.setup{…}to your init.vim, where “xx” is the name of the relevant config. See the nvim-lspconfig README for details. NOTE: Make sure to restart nvim after installing and configuring.- Check that an LSP client has attached to the current buffer:
:lua print(vim.inspect(vim.lsp.buf_get_clients()))
The following is an example configuration snippet from :h lsp-quickstart in
v0.5 to setup a language server for Lua:
local custom_lsp_attach = function(client)  -- See `:help nvim_buf_set_keymap()` for more information  vim.api.nvim_buf_set_keymap(0, 'n', 'K', '<cmd>lua vim.lsp.buf.hover()<CR>', {noremap = true})  vim.api.nvim_buf_set_keymap(0, 'n', '<c-]>', '<cmd>lua vim.lsp.buf.definition()<CR>', {noremap = true})  -- ... and other keymappings for LSP
  -- Use LSP as the handler for omnifunc.  --    See `:help omnifunc` and `:help ins-completion` for more information.  vim.api.nvim_buf_set_option(0, 'omnifunc', 'v:lua.vim.lsp.omnifunc')
  -- For plugins with an `on_attach` callback, call them here. For example:  -- require('completion').on_attach()end
-- An example of configuring for `sumneko_lua`,--  a language server for Lua.
-- set the path to the sumneko installationlocal system_name = "Linux" -- (Linux, macOS, or Windows)local sumneko_root_path = '/path/to/lua-language-server'local sumneko_binary = sumneko_root_path.."/bin/"..system_name.."/lua-language-server"
require('lspconfig').sumneko_lua.setup({  cmd = {sumneko_binary, "-E", sumneko_root_path .. "/main.lua"};  -- An example of settings for an LSP server.  --    For more options, see nvim-lspconfig  settings = {    Lua = {      runtime = {        -- Tell the language server which version of Lua you're using (most likely LuaJIT in the case of Neovim)        version = 'LuaJIT',        -- Setup your lua path        path = vim.split(package.path, ';'),      },      diagnostics = {        -- Get the language server to recognize the `vim` global        globals = {'vim'},      },      workspace = {        -- Make the server aware of Neovim runtime files        library = {          [vim.fn.expand('$VIMRUNTIME/lua')] = true,          [vim.fn.expand('$VIMRUNTIME/lua/vim/lsp')] = true,        },      },    }  },
  on_attach = custom_lsp_attach})
We see that things like keymap setup, root detection and attaching to the correct buffer was all manual. So while this worked well, it was far from an out-of-the-box solution.
The following versions brought general improvements to the LSP implementation, with refinements to diagnostics and overall performance. Plugins such as nvim-lsp-installer (succeeded by mason.nvim) and nvim-cmp became popular, which took advantage of LSP integration to provide enhancements to the overall experience. The diagnostics API also became separate from the LSP API, allowing for non-LSP diagnostics from linters and formatters. However LSP was still a low-level capability, with these plugins still defining what ‘useable’ LSP meant in Neovim. This also added confusion for new users over why it was a requirement to install plugins to access what were supposed to be built-in features.
The current landscape
Big changes came in v0.11 with the addition of vim.lsp.config() and
vim.lsp.enable(). These new API’s allowed for simpler LSP configuration, with
nvim-lspconfig now being more of a reference point for language server
configuration options. Setting up a language server for Lua, for example, was
now a lot simpler. From :h lsp-quickstart in v0.11+:
vim.lsp.config['lua_ls'] = {  -- Command and arguments to start the server.  cmd = { 'lua-language-server' },  -- Filetypes to automatically attach to.  filetypes = { 'lua' },  -- Sets the "workspace" to the directory where any of these files is found.  -- Files that share a root directory will reuse the LSP server connection.  -- Nested lists indicate equal priority, see |vim.lsp.Config|.  root_markers = { { '.luarc.json', '.luarc.jsonc' }, '.git' },  -- Specific settings to send to the server. The schema is server-defined.  -- Example: https://raw.githubusercontent.com/LuaLS/vscode-lua/master/setting/schema.json  settings = {    Lua = {      runtime = {        version = 'LuaJIT',      }    }  }}
vim.lsp.enable('lua_ls')
Note that the only required options that must be specified are the command for
the language server, the root markers used to decide the workspace root and the
filetypes the client will attach to. That’s it. vim.lsp.enable() also
separates the configuration from enabling the server, allowing the user to
determine when and where the configuration should be applied.
Language sever configurations can also be placed in Neovim’s runtimepath. So the
same configuration for lua_ls can be placed in ~/.config/nvim/lsp/lus_ls.lua:
return { cmd = { 'lua-language-server' }, filetypes = { 'lua' }, root_markers = { { '.luarc.json', '.luarc.jsonc' }, '.git' }, settings = { Lua = { runtime = { version = 'LuaJIT', } } }}This can be done with a separate file for each language server you want to use.
lsp/├── basedpyright.lua├── clangd.lua├── lua_ls.lua├── ruff.lua└── rust_analyzer.luaThen vim.lsp.enable() can be called with all the language severs you want
enabled. So in your init.lua you would have vim.lsp.enable({"basedpyright", "clangd", "lua_ls", "ruff", "rust_analyzer"}). What’s nice about this is that
it follows the pattern Neovim already uses in having configuration files in the
runtimepath to automatically load when needed.
As well as easier configuration, Neovim also now sets some default options and
keymaps (:h lsp-defaults), such as “grn” for vim.lsp.buf.rename(), “grt” for
vim.lsp.buf.type_definition() and “gO” for vim.lsp.buf.document_symbol and
“K” for vim.lsp.buf.hover(), among others. vim.lsp.buf.hover() now uses
Markdown treesitter highlighting, allowing for code samples in documentation to
be shown with proper syntax highlighting. omnifunc is also set the
vim.lsp.omnifunc() by default (this has been the case for a while).
Autocompletion
As mentioned earlier, omnifun is set to vim.lsp.omnifunc() by default. This
means that just having a language server attached to the curent buffer gives you
manual LSP completion with <C-X><C-O>. However, this can be extended to enable
autocompletion from LSP sources using the vim.lsp.completion module. Enabling
autocompletion can be done with vim.lsp.completion.enable(). For example, to
enable LSP autocompletion when attaching to a language serve:
vim.api.nvim_create_autocmd("LspAttach", { group = vim.api.nvim_create_augroup("lsp-group", {}), callback = function(args) local client = assert(vim.lsp.get_client_by_id(args.data.client_id)) if client:supports_method("textDocument/completion") then vim.lsp.completion.enable(true, client.id, args.buf, {autotrigger = true}) end end,})
By default this will trigger completion on whatever the language server defines
as its triggerCharacters. To trigger the completion on every keypress like
many completion plugins do there are two options. The first is to override the
trigger characters before calling vim.lsp.completion.enable:
vim.api.nvim_create_autocmd("LspAttach", {  group = vim.api.nvim_create_augroup("lsp-group", {}),  callback = function(args)    local client = assert(vim.lsp.get_client_by_id(args.data.client_id))
    # Override language server defined trigger characters    local chars = {}; for i = 32, 126 do table.insert(chars, string.char(i)) end    client.server_capabilities.completionProvider.triggerCharacters = chars
    if client:supports_method("textDocument/completion") then      vim.lsp.completion.enable(true, client.id, args.buf, {autotrigger = true})    end  end,})
Alternatively, you could create an autocommand which calls
vim.lsp.completion.get() on the InsertCharPre event.
vim.api.nvim_create_autocmd("InsertCharPre", { callback = function() vim.lsp.completion.get() end})Potential limitations
Based on your particular use case, the functionality provided by native
autocompletion may be more than enough. However, there are certain features
provided by plugins such as nvim-cmp and
blink.cmp which aren’t directly available
using builtin autocompletion. For example, automatically showing documentation
and signature help as you type isn’t something that’s builtin. Signature help
can be shown with <C-S>, as well as hover documentation with K.
mini.completion is
a really nice middle ground which isn’t as complex as the other. It uses
Neovim’s native popup ins-completion window while blink.cmp and nvim-cmp
implement their own popup menus. nvim-cmp itself is also only a completion
engine and requires separate plugins to provide completion sources. They do
provide features like ghost text and completion from sources other than LSP
which isn’t available with mini.nvim or natively (kind of, see :h 'complete'), so it’s really up to you depending on what features you feel you
need.
Also note I am NOT trying to bag on blink.cmp or nvim-cmp (they’re both really great projects) or the use of plugins in general, but if you’re wanting to use the native option and find it’s slightly lacking in the some features you might want then mini.nvim is a good option (honestly I’d recommend all of Evgeni’s plugins I’ve used).